Learn how to correctly export your reports from Simple View so you can see that Group Sales data in ZDOS!
Below are steps to export your CRM Report from Simple View...
Need general information on CRM data and Zartico? Click here!
Simple View Partners:
This video shows you how to build your Simple View report or you can follow the steps below.
You’ll be building a Lead-based, Simple Report within your group/meeting sales User Group.
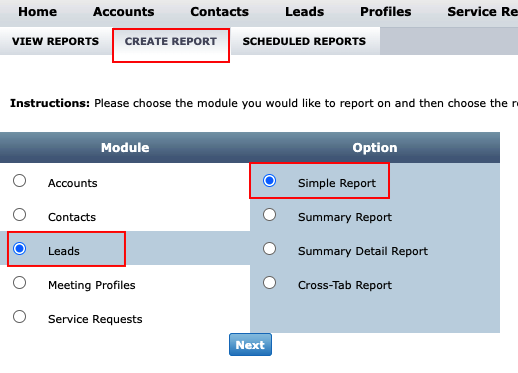
Step 1: To begin, Login to Simple View > click on Reports > Create Report.
Select the Leads Module> select Simple Report
Hit Next
STEP 2: In the Define Filters section, on the left hand side, you want to select Definite Date from your Status History folder as well as Lead Date (which could be called “Tentative” or “Prospect” in your individual CRM).
Once you’ve selected both dates, set them both to “After” 01/01/2015.
Finally, be sure to change the Select Operator to “OR”.
Hit Next

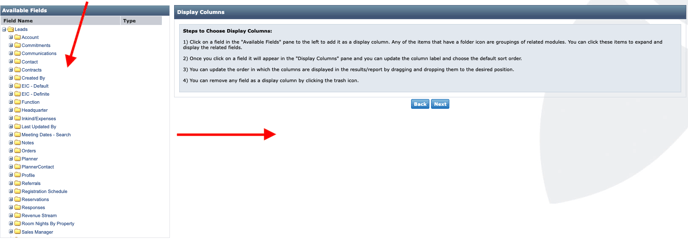
Now you’re at the Display Columns section. This is where you’ll be selecting Zartico's standard fields on the left side of the screen and placing them in the same order as our template on the right side of the screen.
STEP 3: The screenshots below represent our standard field template. Please follow this template and select each field you see below.
.png?width=688&name=2%20(1).png)
Please note, we recommend sorting Lead Date by descending order (highlighted in red below) if your destination has a lot of meeting sales data. Sometimes SimpleView reports are cut off after 30,000 rows of data. By sorting in descending order you’re ensuring that IF any rows of data are cut off it’s your oldest data.
Please also see the note in blue regarding Economic Impact fields.
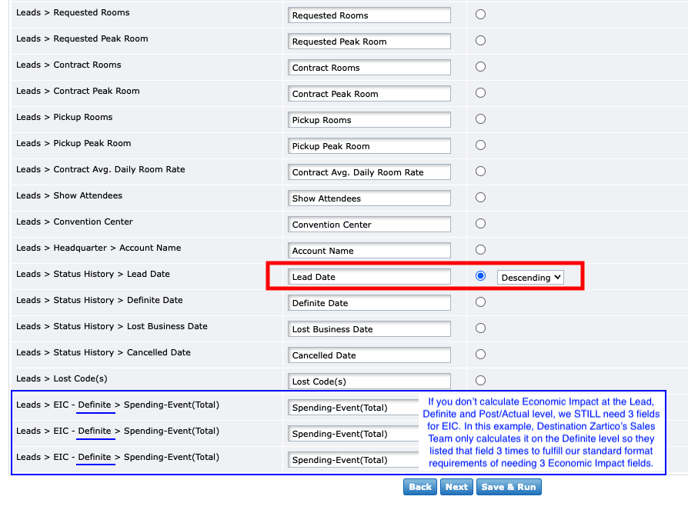
If your Sales Team does calculate Economic Impact at all 3 stages of a lead your report would look something like this. What’s important here is that you list Lead first, Definite second and Post/Actual third.

We know that some DMOs don’t use Destinations International Economic Impact Calculator within their CRM (or at all). In this case, you’ll want to select the “EEI Value” field 3 times. Your report would look something like this:

STEP 4: Now that you’ve selected all of the display fields, the next step is to edit the naming convention of a couple fields. Please use the template below to update the naming conventions in each field outlined in red. Exactly how you see the field Label listed below is exactly how we need it labeled in your report. For example, you’re going to add the word “Account” before “Market Segment” for the Account Market Segment field.
.png?width=688&name=9%20(2).png)
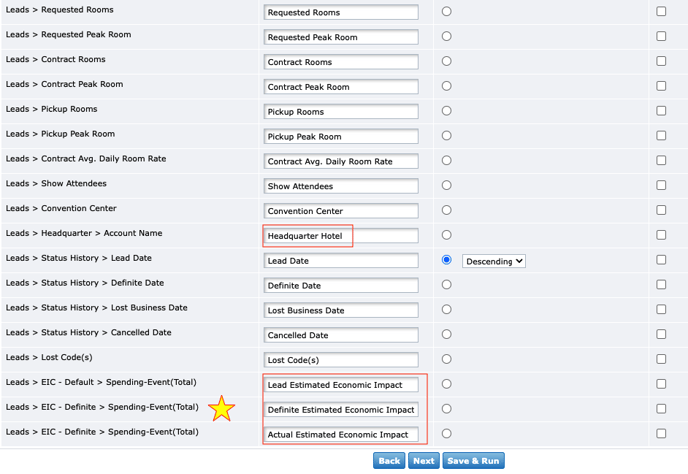
⭐ No matter what EIC/EEI fields you’re using in your report please update the label as you see in the above screenshot.
STEP 5: Once you’re done updating the necessary field names, hit Next > Save the report. You can name the report whatever you’d like!
Again, we encourage you to set-up auto scheduling for this report. If you’re unsure on how to do that please reach out to SimpleView for training.
*Please note* we must receive your report as a CSV file. If you only have the ability to send as a PDF please reach out to SimpleView for assistance.